
OBJECTIVE
Efforts towards conserving endangered species only increase as populations continue to decline along with their ecosystems. Researchers at SCBI work to discover ways of contributing to the reproduction of these species without having to perform invasive procedures directly on them. One of these ways involves the development & advancement of Assisted Reproductive Technologies (ARTs). ARTs are important technologies conventionally applied to humans who lack the ability to successfully conceive in their own natural environment. Some of these technologies include, but are not limited to, in vitro fertilization (IVF), intra-cytoplasmic sperm injection (ICSI), artificial insemination (AI), embryo transfer etc.

As these technologies continue to advance, not only are they utilized towards those facing infertility but in animal conservation efforts as well. Derivation of embryos from oocytes collected and fertilized in vitro would be a beneficial technique in application to species who have difficulty breeding in captivity and those who have passed before/outside their breeding season. Large mammalian species like dogs and cats are useful models in this application due to their biological similarities to endangered species like wolves and big cats. However, research regarding the discovery of a proper system to conduct such efforts is limited. Therefore this project, proposed by Dr. Jennifer Nagashima, explores idealizing an in vitro environment for ovarian tissue culturing in the domestic dog.
This project utilizes a micro-fluidic chip model to maintain cultures which allows for simulation of ‘blood-flow’ as well as airflow and nutrient availability to the cultured tissue.
A Little about our System

Dr. Jennifer Nagashima had previously published a study assessing the functionality of the ‘organ-on-a-chip’ culturing technique in the maintenance and development of ovarian tissue derived from domestic dogs and cats. Organ-on-a-chip is a developing 3D tissue culture system that allows the recreation of an organ’s physiology and function on a small scale incorporating the use of microfluidics. This study utilized the ovary-on-a-chip alongside the conventional agarose gel block culture method and resulted in both systems supporting the maintenance of ovarian tissue (more successfully in the cat than dog). The agarose gel block method is advantageous for tissue culture as it allows for the presence of an air-liquid interface while the organ-on-a-chip is advantageous as it integrates media flow throughout the system, mimicking in vivo blood-flow conditions.
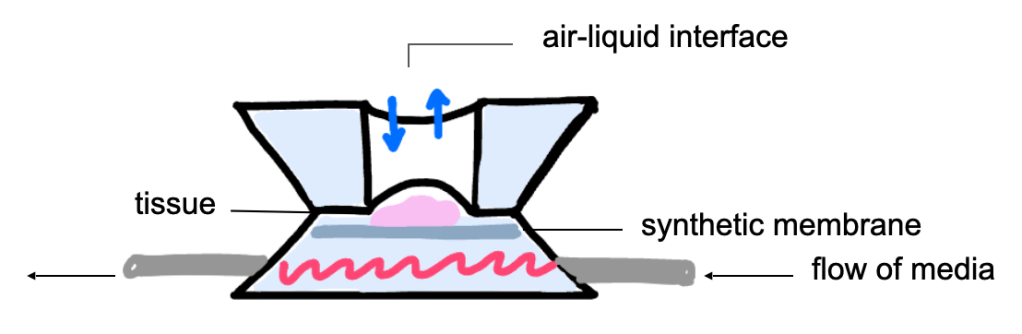
So, the culture system used in the study I was able to participate in was designed to integrate the advantages of these two systems into one. The microfluidic chip holds the tissue in the center of the structure with a hole above and a synthetic membrane below. Below the membrane is the flow of culture media throughout the system.
Week 1
Chip Making:
In the first week I was introduced to a variety of techniques and procedures that would later be applied to the set-up of the tissue culturing. These techniques include the creation of the micro-fluidic chip structure, flow set-up, ovarian tissue isolation and more.
The micro-fluidic chip structure is synthesized from a gel-like material called Polydimethylsiloxane or PDMS. This material is commonly used in the fabrication of micro-fluidic chips as it’s composition allows for proper permeability of gases such as oxygen and carbon dioxide. It is also a biocompatible material that is transparent which allows for observation of the tissue/media throughout the process of culturing. Once the gel is created it was poured into a mold developed in the Formlabs Form 3+ 3D printer using a biocompatible resin. The molds could then be placed in an oven around 60°C to bake for 20-30 minutes until tacky. Two of the structures were placed on top of one another with a thin, synthetic membrane in between to cover the sunken chamber in the center. This is where the ovarian tissue will later be placed to allow for it to receive proper air-liquid interface and culture media exposure.
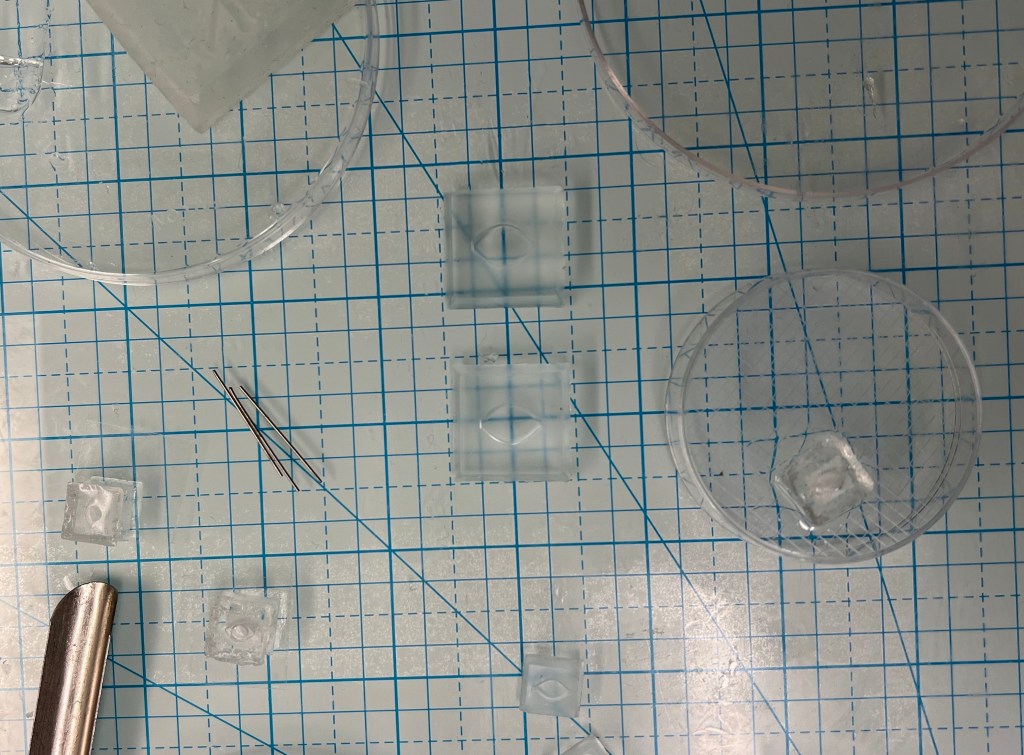
It came as a surprise to me how simple it was to create these fluidic chips, with the only complication being the small size. Therefore, a bigger mold was created in the 3D printer roughly about 3x the size of the initial structure which was later tested for its efficiency.
Ovarian tissue:
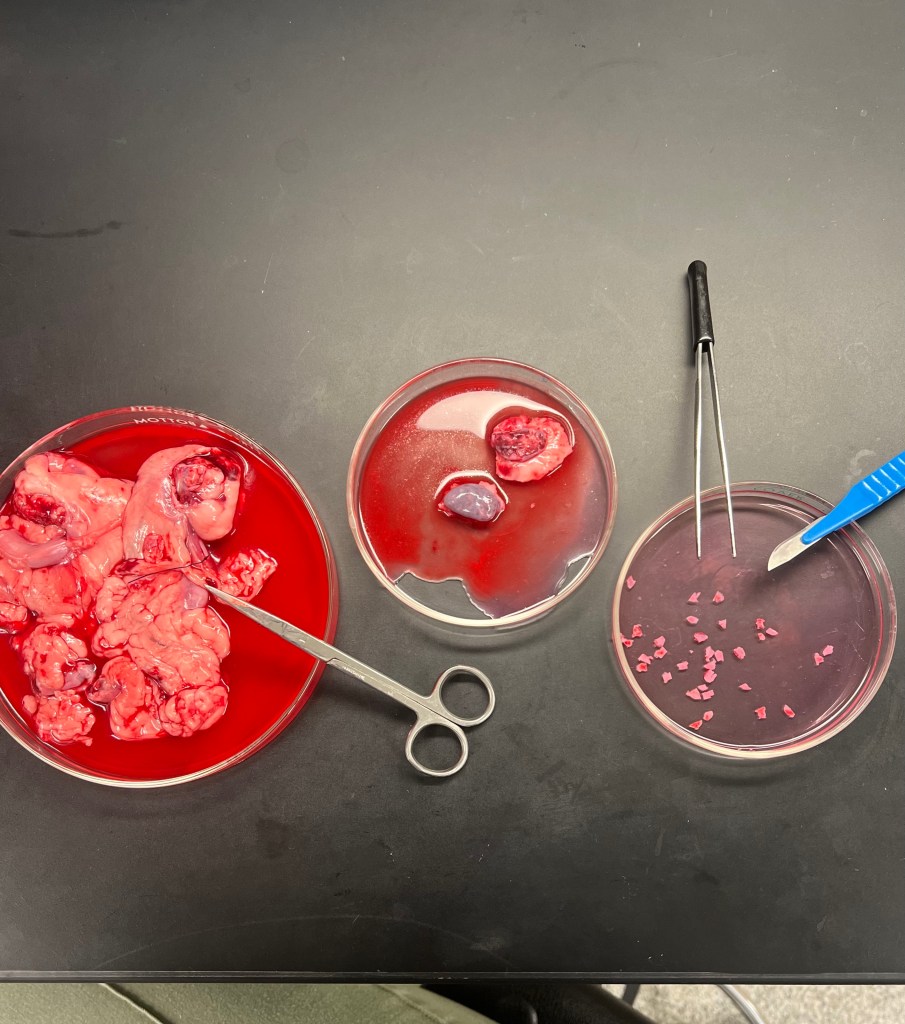
Ovarian tissue was isolated from same-day dog or cat ovariohysterectomies performed at local animal clinics. I practiced harvesting the ovarian tissue by isolating the ovaries from the rest of the reproductive tract and inducing a small incision into the center of the ovary. From this small incision point you can lightly glide the scalpel blade down the ovary to obtain a slice of ovarian tissue. The slices of tissue accumulated were ~0.5 – 1 mm thick, it is best to avoid harvesting the vasculature present underneath the tissue to ensure you are obtaining pure ovarian tissue.
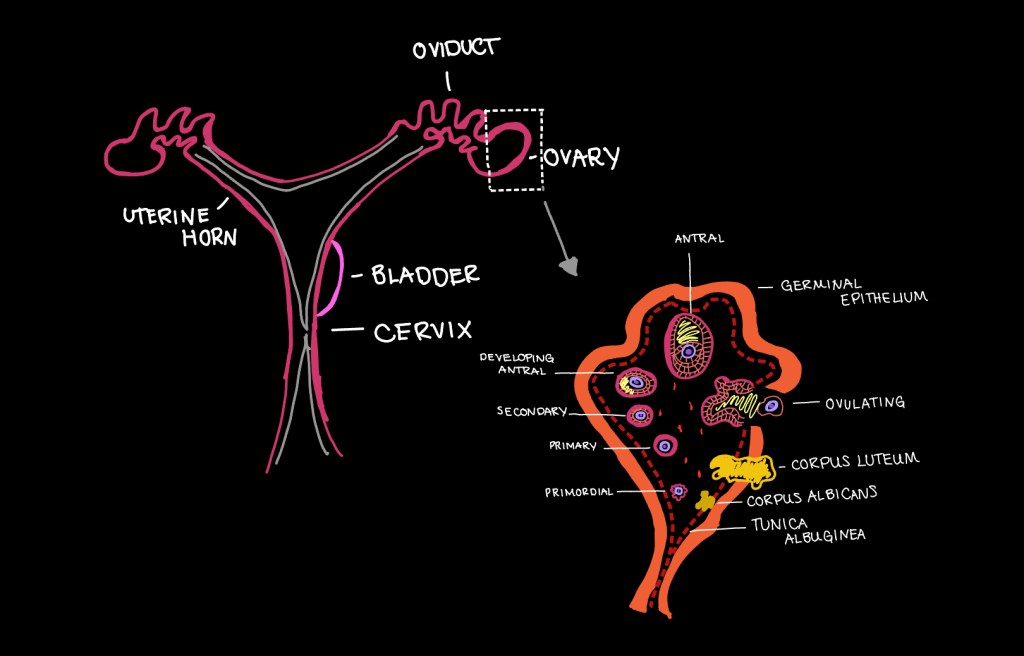
The ovary is comprised of a germinal (surface) epithelium layer followed by a layer of granulosa cells. Covering the surface are a multitude of follicles ranging in stages of development from primordial to antral. Follicles are the structures that house the oocyte later released through ovulation. When the oocyte is released from the follicular structure a hardened, yellow- in- color cyst is left behind termed the corpus luteum. This corpus luteum eventually retracts back into a follicular structure to prepare the uterus for embryo development. We would avoid harvesting tissue with several corpus luteum present, as subsequent to the tissue culture we would be observing follicular development through the first five stages.
It is ideal to derive tissue from animals hovering around the age of 5-6 months, preferably even younger. As the animal grows older it will have experienced more ovulation cycles, in turn more follicular bursts/ formations of corpus leutea which could affect the way tissue grows in vitro. The ovarian tissue I isolated was from animals ranging in age from 9 weeks old – 1 year. also due to the fact tat we are interested in developing primordial follicles.
Week 2
Chip Assembly:
During the second week, we began assembling the micro-fluidic chip structures so I could become familiar with the technique behind it before it came time to culture cells. Of the two PDMS structures a small hole in middle chamber gets cut out in the top layer, using a simple skin biopsy punch, while the bottom remains intact with the synthetic membrane placed over top. Two small needles are inserted through the bottom layer on either side of the chip to later allow media to be flowed through the structure. Once the layers are placed on top of another, the ovarian tissue is placed in the center through where the hole was punched out.
When the culture will begin, the open hole will remain facing up to mimic proper air flow. One needle is connected to a syringe through small tubing which will contain the cell media to keep the tissue viable. The other needle is connected through tubing to a small microcentrifuge tube to collect the flow-through media. Once chips are assembled, they are flushed through with phosphate buffer saline solution (PBS) with Penicillin/Streptomycin antibiotic to prevent interference with bacteria during the culture. Chips are prepped the day before the first day of culture using endothelial growth medium (with fetal bovine serum for cats) to ensure the environment is suitable for culturing. Follicle stimulating hormone (FSH) was also added to the media which is a hormone released from the anterior pituitary gland in the hypothalamus in response to Gonadotropin Release Horomone during sexual development.
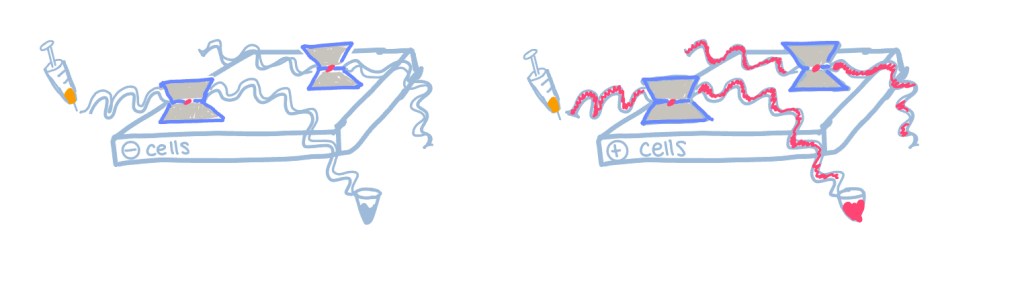
Dr. Jennifer Nagashima had previously executed this organ-on-a-chip technique which produced results that seemed to favor cat ovarian tissue development over dog. These results inspired a desire to determine a way that this system could be improved to support dog ovarian tissue, as well as just promote more follicle/tissue growth overall. Therefore, a control system was set up with the generalized EGM media and ovarian tissue with a comparison group using a co-culture with endothelial cells. Endothelial cells line the vasculature in the body to play a role in exchange of blood flow and growth/stimulation of surrounding connective tissue. Blood and lymphatic vessels also contribute to the development of antral fluid in the cavity of antral follicles during folliculogenesis. Therefore, it was hypothesized that a co-culture with endothelial cells derived from the uterus of the animal in question would help promote follicular growth.
Species of SCBI:
During this time I was also able to become more familiar with the wide variety of endangered species housed at the Smithsonian Conservation Biology Institute. These animals range from various kinds of cranes, black-footed ferrets, cheetahs, maned wolves, red pandas, the Przewalski’s horse, and more! Only a very select few of these animals are kept in areas viewable to interns like myself, as most species can become frightened and hostile around those who are not familiar animal keepers. Nonetheless, I was simply amazed to even be living on land shared with these beloved species and surrounded by individuals conducting research in favor of conserving them. SCBI spans over 3,000 acres of land which allows for natural-like, appropriately designed areas for the animals to reside. These areas are full of open space and adequate biodiversity to ensure all species can thrive in a natural environment. Maintaining these species raises urgency as they contribute to the health and function of our surrounding ecosystem, scientific/medical research, and simply out of respect for the creatures that inhabit our Earth. Here is some info about just a few of the many animals I was able to see:
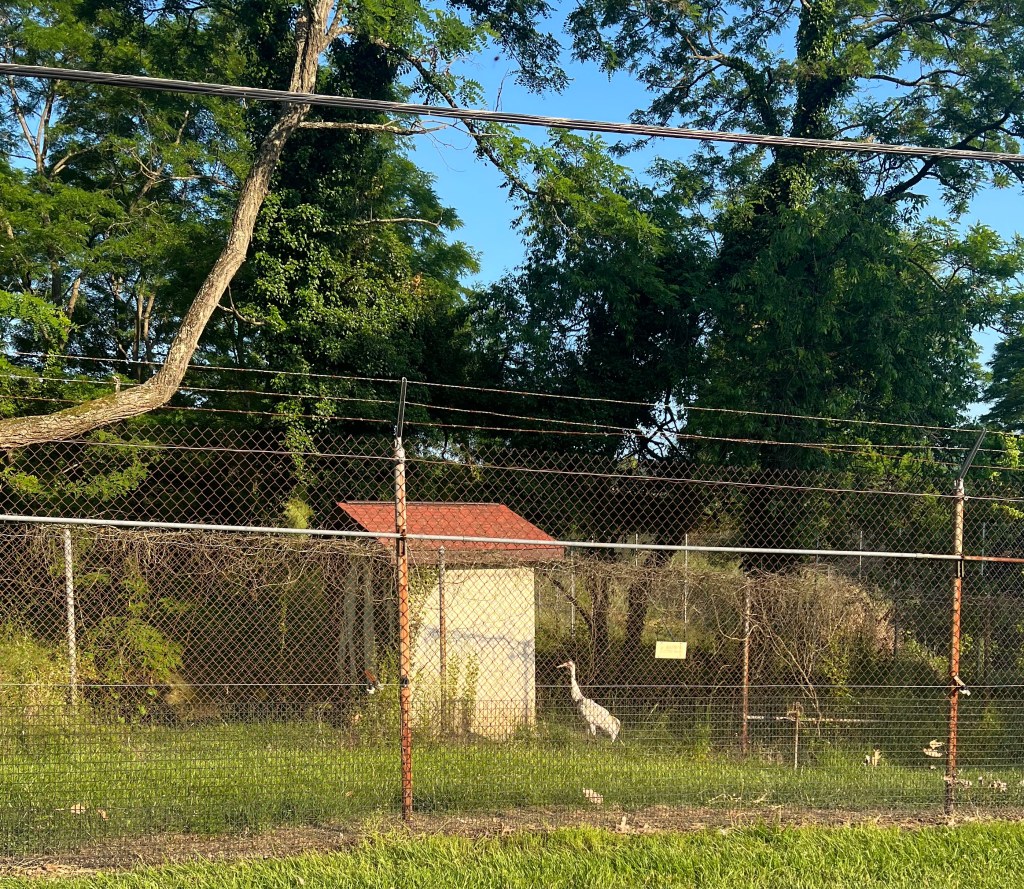
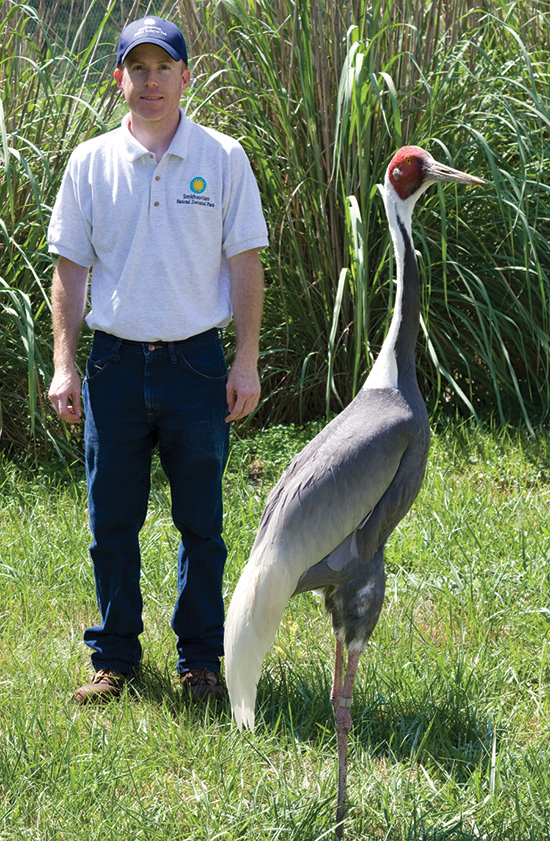
The Cranes
Cranes are an extremely important family of birds as they consume a wide variety of plants & animals as well as provide food for smaller creatures. They are the most endangered family of birds in the world with eleven of their fifteen species being threatened, while four of those species are held at SCBI. SCBI cares for whooping, white-naped, red-crowned, and hooded cranes! You may have even seen the viral story of ‘Walnut’, the hooded crane who was experiencing fertility abnormalities and ended up falling in love with one of SCBI’s fellow animal keepers, Chris.
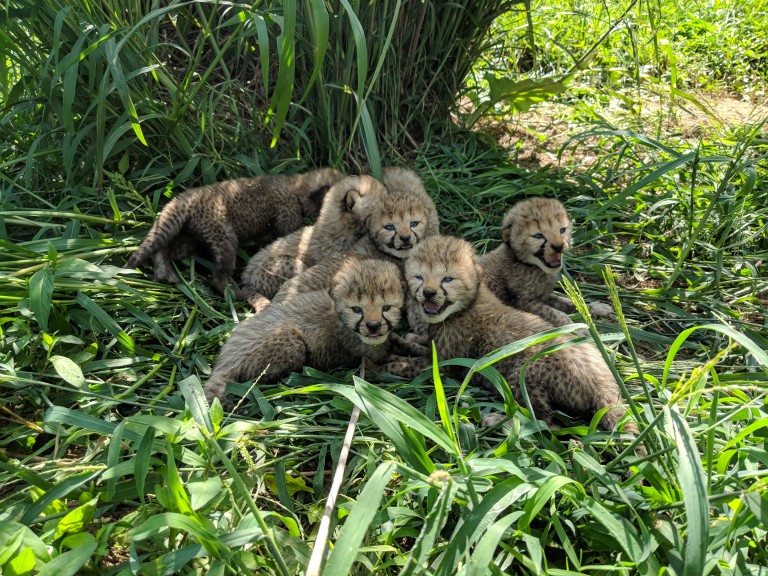
The Cheetah
Throughout history cheetahs have roamed throughout the land of Asia and Africa, but are seen to be going extinct in several countries in recent decades classifying them as vulnerable in terms of conservation . As they continue to be housed at SCBI, scientists are discovering ways to enhance their fertility as Cheetahs possess poor fecundity with approximately only ~20% of those reproducing in captivity compared to in the wild.
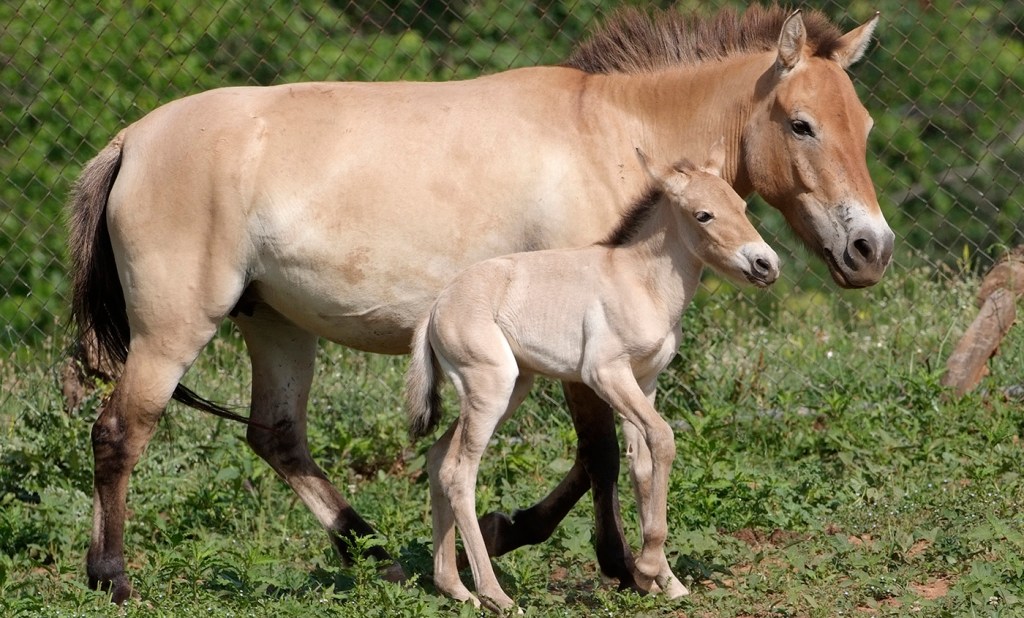
The Przewalski Horse
The Przewalski horse is originally native to central Asia, but now endangered, can only be found through reintroduction into places such as Mongolia, China, and Kazakstan. They are unique in the fact that they are the only type of wild horse that remains in the world! These horses have never been domesticated and therefore possess a short and stocky build, erect manes, and a large head and thick neck. The horse retain these features to help protect from the weather conditions of their native environments. I was lucky enough to be housed in the dorm building across the way from where these horses are held, making them my view every morning from the kitchen window!
Week 3
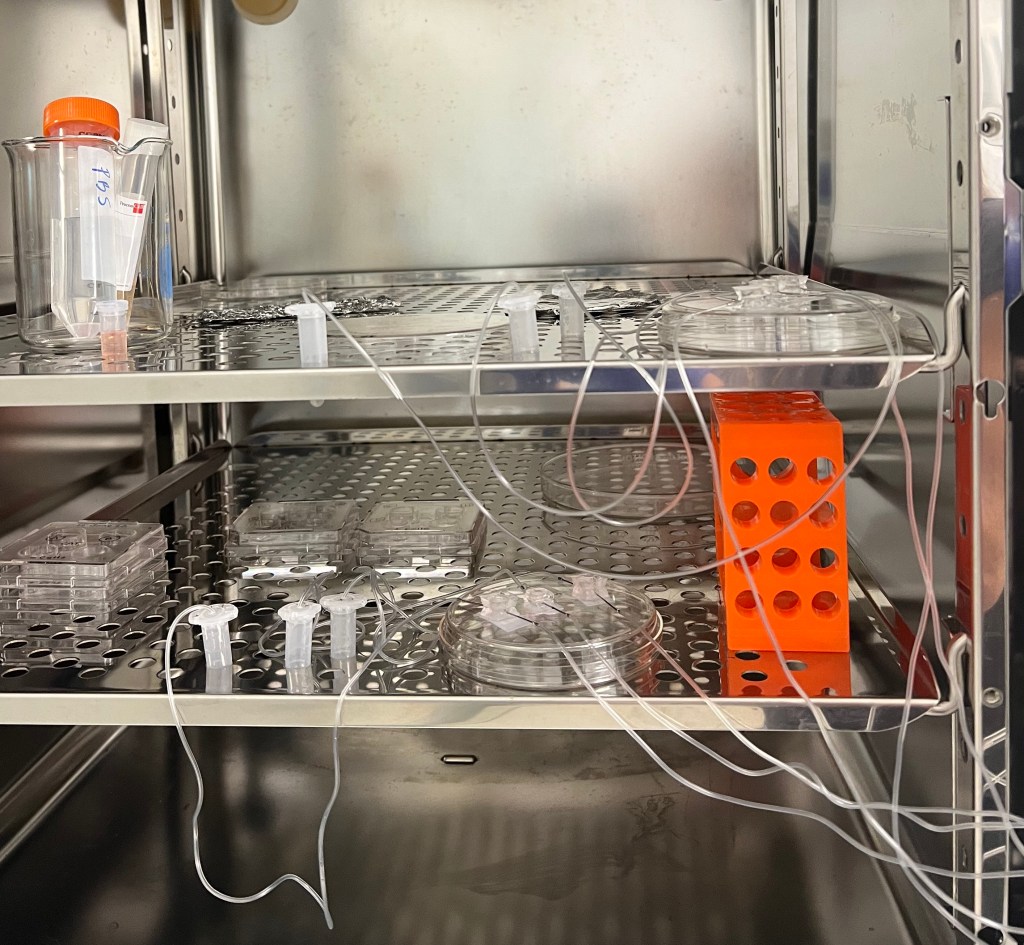
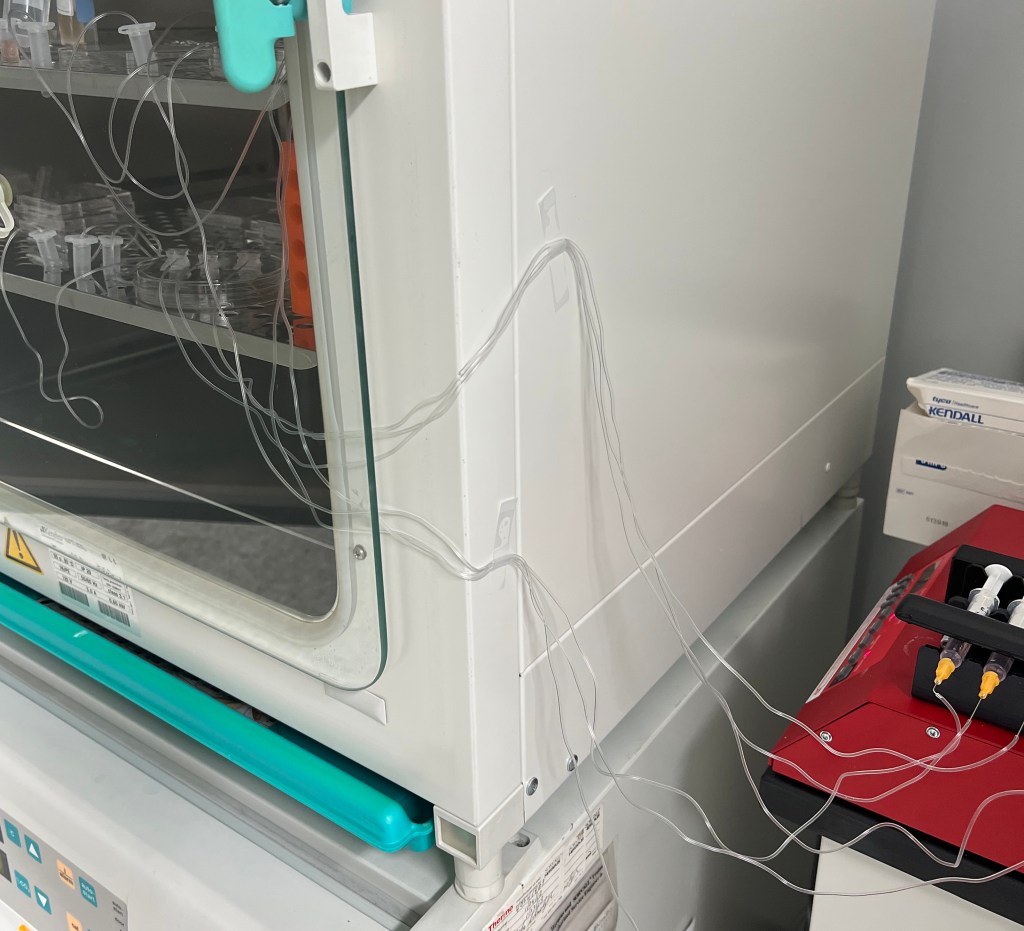
First Culture Setup:
During the third week I began the first culture set up as seen below. After the assembled chips are washed with PBS and prepped with EGM the day prior, the tissue can be isolated from the ovary and placed inside the structure to begin culture. The first culture consisted of two cats:
- Cat A = 1 year old, domestic short hair
- Cat B = 10 months old, domestic short hair
Ovarian tissue was derived on the day of the spays and placed inside the chip as well as in 4-well plates with agarose gel blocks. Agarose gel blocks are sufficient in promoting cell/tissue growth as they are known to allow slow diffusion of the cell media and nutrients throughout the block to result in cell anchorage at the bottom of the dish. These plates would later be used as a comparison to determine how sufficient the chips were in promoting cell growth. The chips and agarose blocks were placed inside an incubator at 37°C with 5% CO2 to simulate conditions in the body. Syringes with 1 mL of EGM (+ FSH) were set up on a syringe-pump outside the incubator which can be set to a desired pump rate to allow the culture to persist for days at a time. Once the syringes were set a rate to pump 10 µL/hr, the culture was ready to begin!
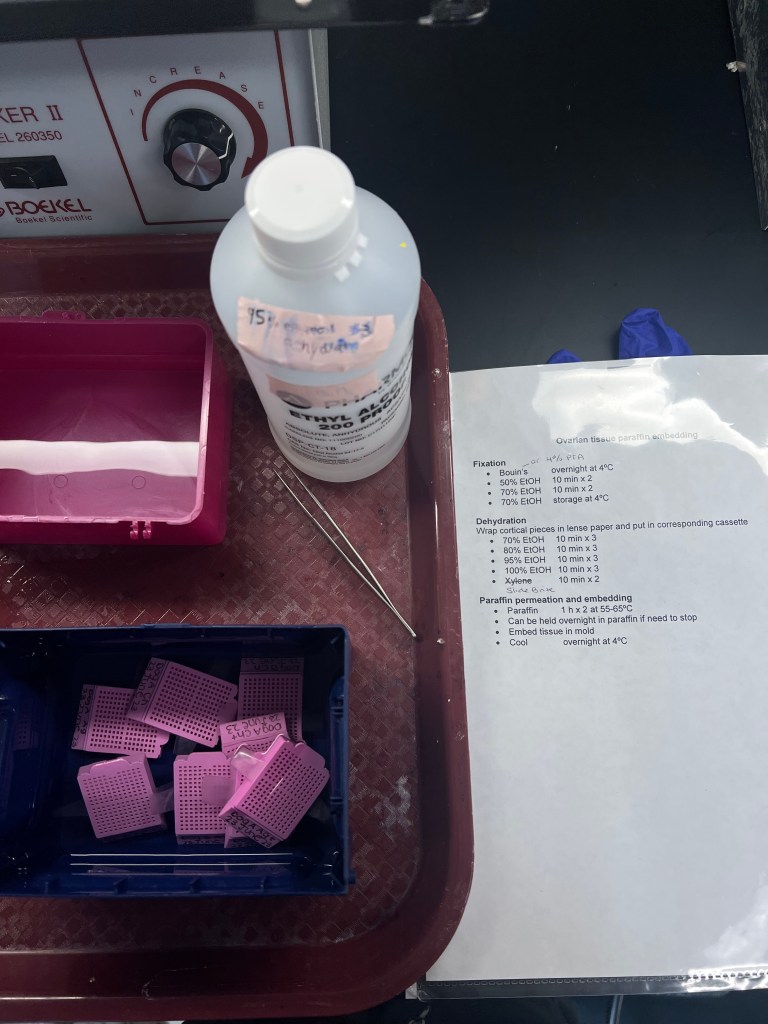
EMBEDDING:
After the 6 day culture came to end I became familiar with the process of embedding the cultured tissue, as well as fresh controls for histological observation. The tissue is wrapped in a small piece of cortical lens paper and secured in a cassette to undergo a series of ethanol washings for dehydration. After dehydration, the cassettes can be placed in several jars of paraffin for permeation and subsequent embedding in the desired mold. This process takes a few hours but ultimately results in your tissue securely placed in a small square of wax which can be cut into thin slices for microscopic observation.
The tissue slices are cut using a device called a microtome which allows for cross sections of tissue with your desired thickness (in this case we used 6 microns) to be slipped onto a glass slide and stained.
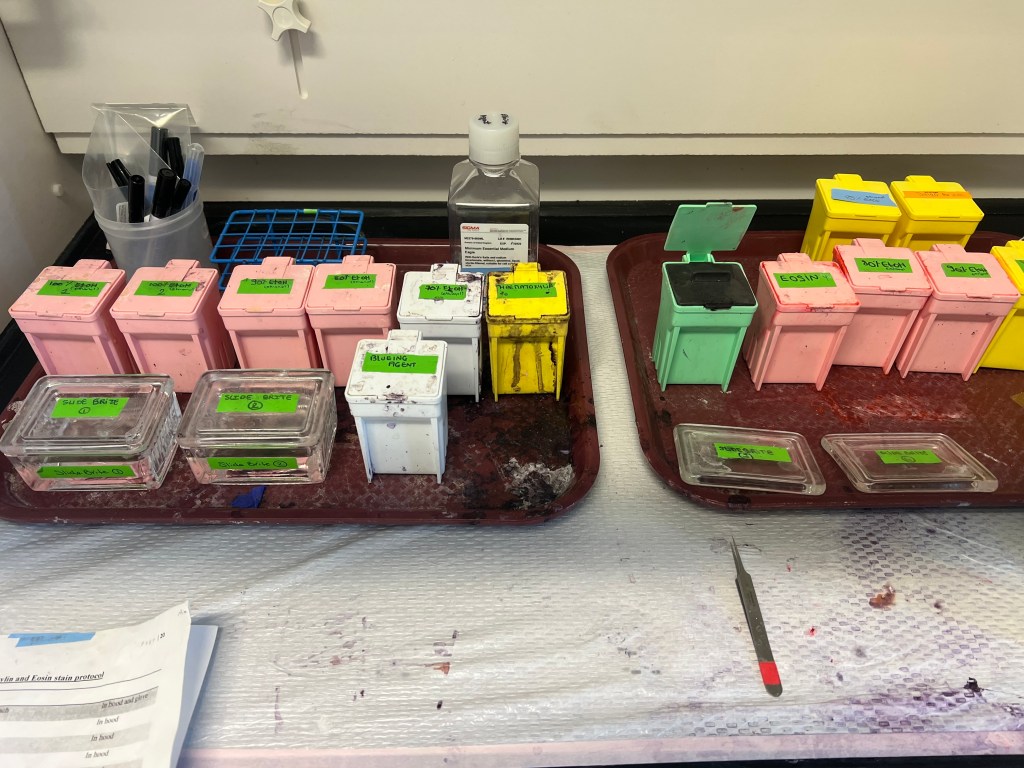
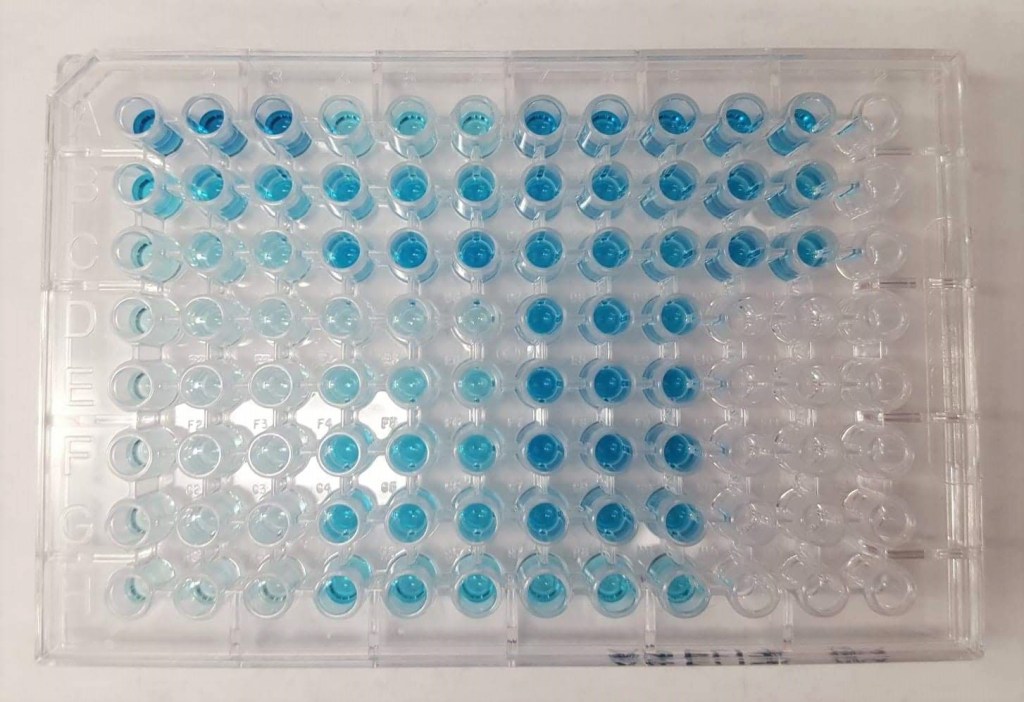
STAINING:
The staining process consists of several ethanol washes of varying concentrations and hematoxylin and eosin staining. Hematoxylin is a stain that attaches to cell nuclei and appears as a blue/purple hue when completed. Eosin is similar in that it targets a specific cellular components but in this case highlights cellular cytoplasm in the form of a pink/red color. Once staining is complete, slides are ready for viewing under the microscope to observe follicle growth, cell viability, and any other histological changes.
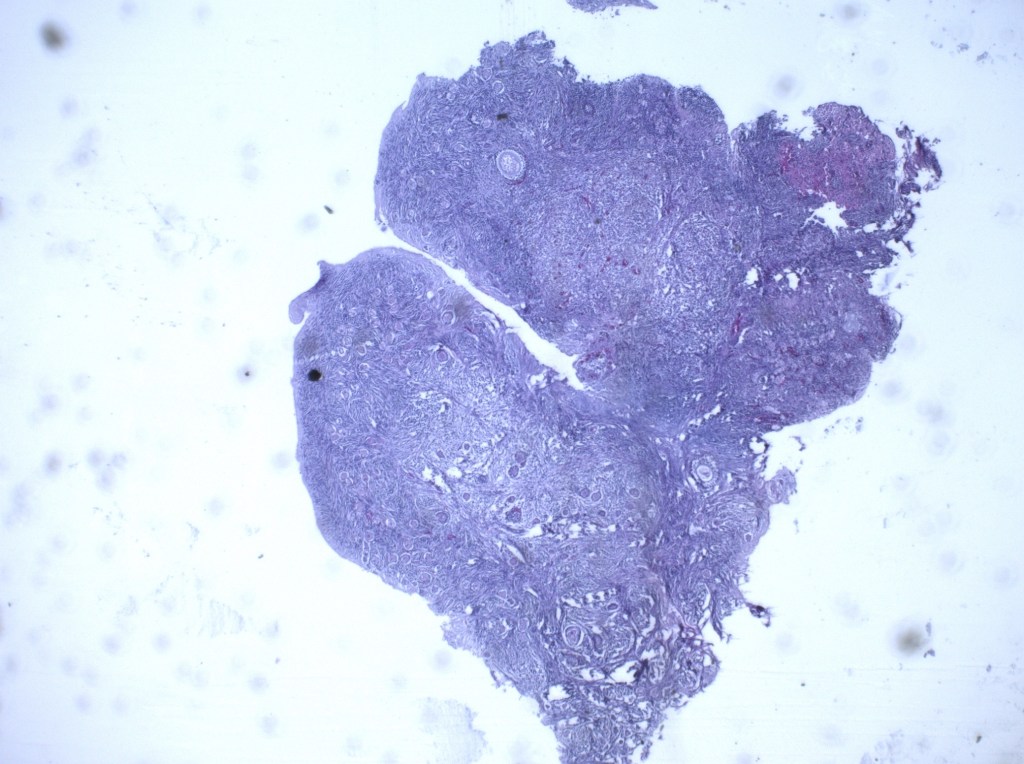
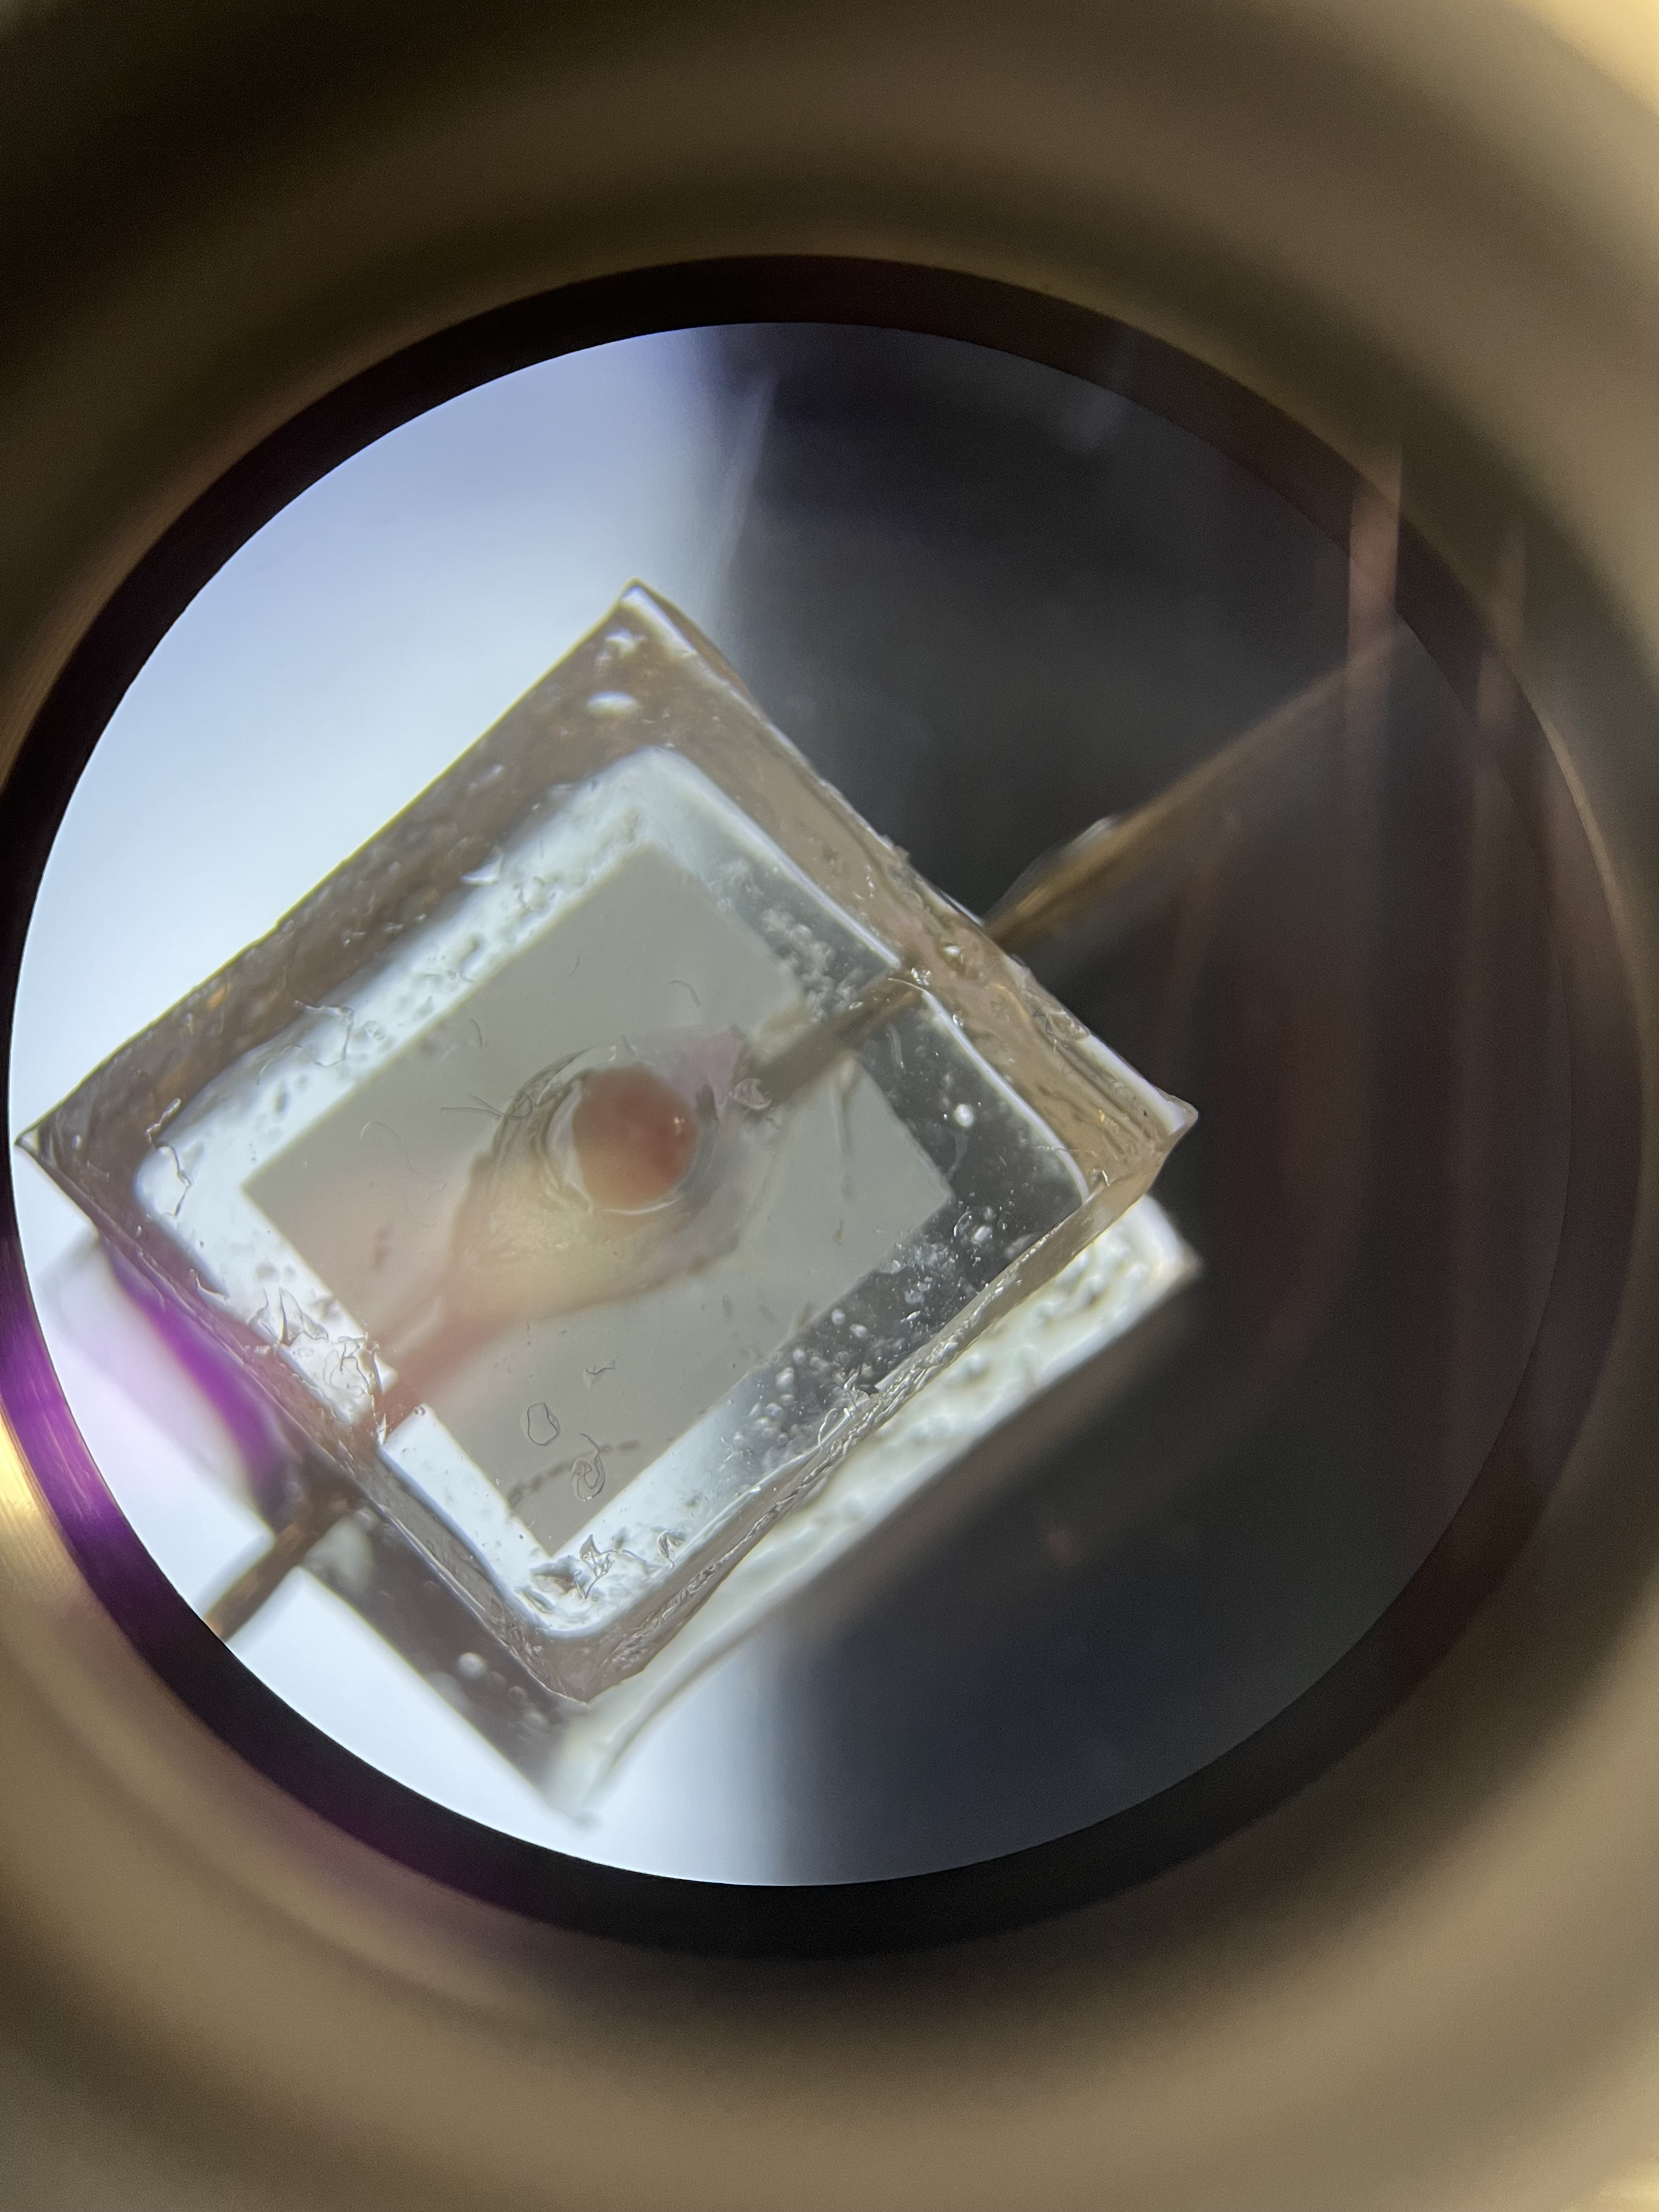
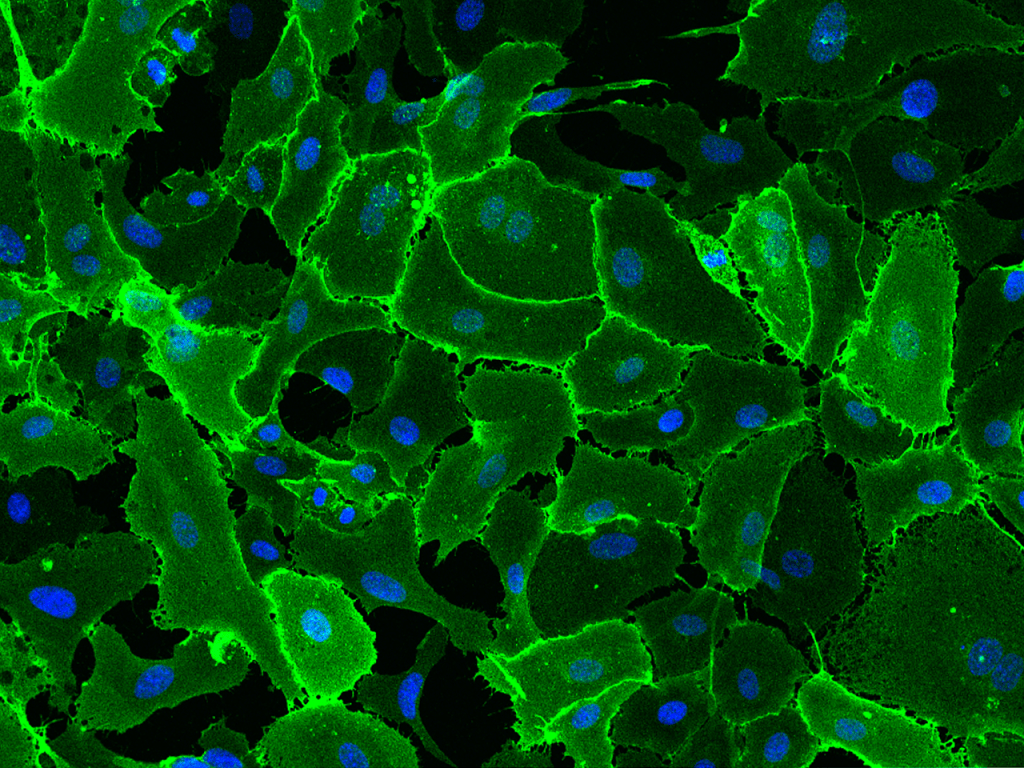
When the staining process is complete and the tissue is ready to be viewed through the EVOS Cell Imaging microscope, it will look something like this
⇐
Staining of tissue is important as it allows you to visualize any physical changes present in tissue after being cultured in the desired treatment. In our case, this is extremely useful in observing changes in follicular structure as well as an abundance of those follicles in each stage. Number of follicles in secondary/antral stages in treatment groups can be compared to the size/number of pre-antral and antral follicles in fresh tissue to determine if there is significant difference.
RT-PCR:
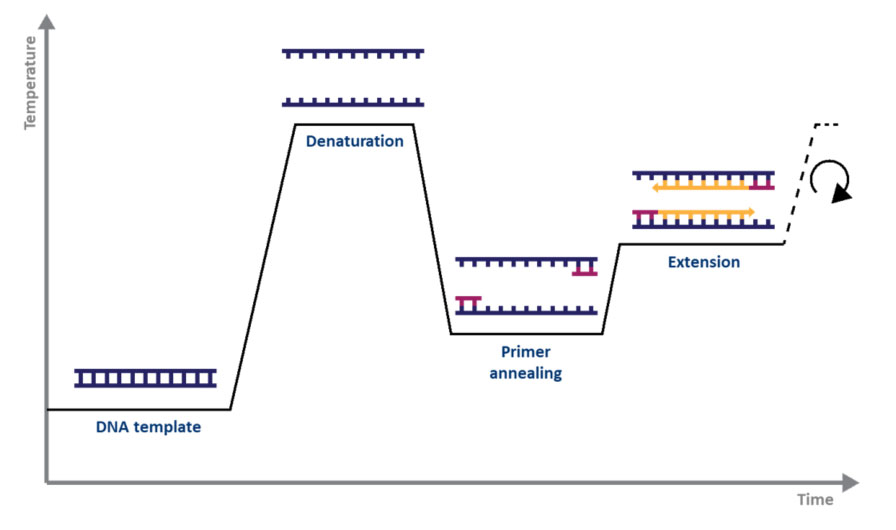
During this week I was also able to begin working with RT-PCR, a technique used in conjunction with histological analyses to determine any changes in the tissue throughout treatment groups. PCR, or polymerase chain reaction, allows you to amplify targeted DNA sequences that are associated with your desired cellular reaction to determine if it is present within the tissue. For example you can amplify sequences resulting from apoptosis, oxidative stress, proliferation, steroidogenesis etc.
I have previously worked with RT-PCR during a molecular genetics laboratory at the University of Miami, so I was able to apply my previous knowledge of the technique to execute the protocol used in this scenario.
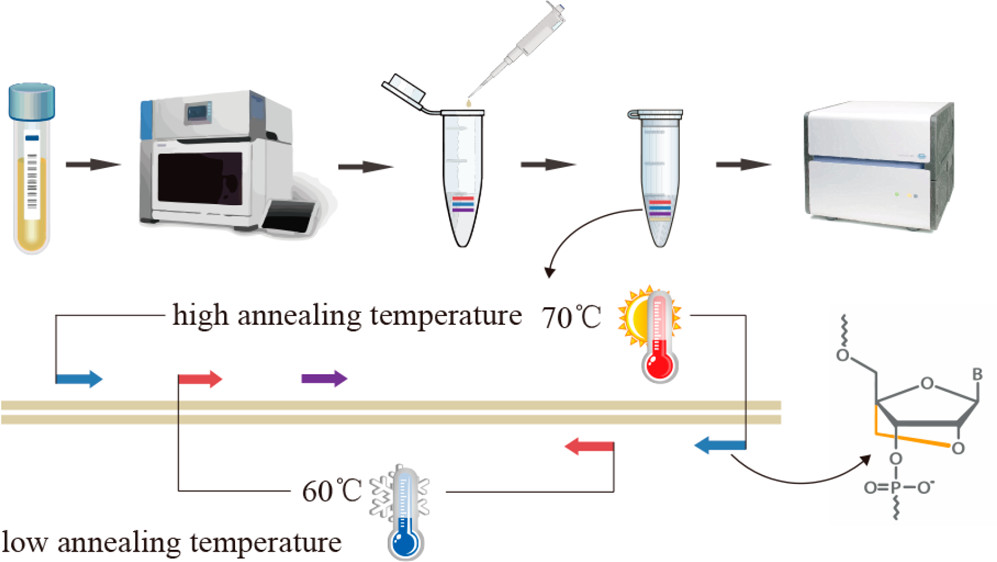
RT-PCR can either stand for reverse transcriptase PCR or real-time PCR. It is termed ‘reverse-transcriptase’ because rather than beginning with an isolated template DNA strand, you are beginning with isolated RNA which is then converted to a complementary DNA strand using a ‘reverse’ transcriptase to be amplified. This technique can be advantageous in comparison to conventional PCR because it limits the chances of amplifying non-specific signals?
Week 4
During week 4 we set up another chip culture including 3 cats (not pictured)
- Cat C – 12 weeks old, domestic short hair
- Cat D – 4 mo. old, domestic short hair
- Cat E – 10 mo. old domestic short hair
The pump was set to 10 μl/hr with the same incubation settings and alongside were the same agarose block conditions. The culture was set to run for the next six days, feeding the cells with new EGM + 2% FBS every other day.
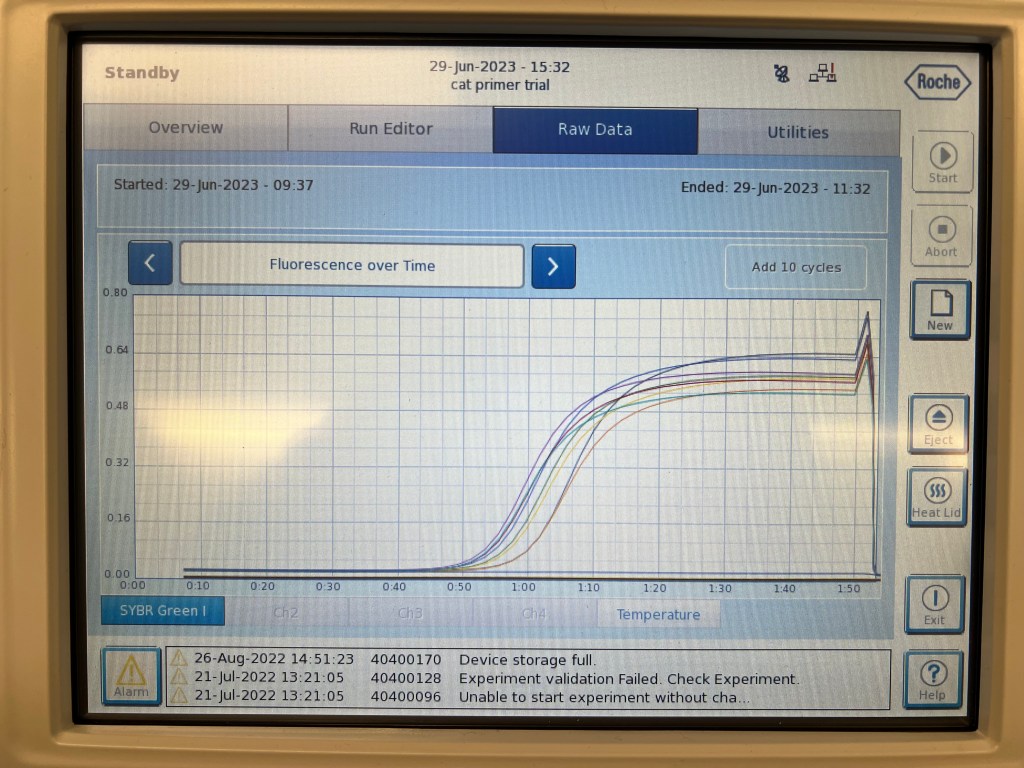
In the previous week I had worked on isolating RNA and producing cDNA, while this week I performed efficiency tests to observe the accuracy/capacity of selected primers. Primers are small, short sequences that are complementary to whatever DNA sequence you are looking to amplify. Forward primers bind to the (-) strand, or antisense strand, of the double stranded DNA which is generally used as the template to produce mRNA. The reverse primer binds to the (+), or coding strand, which is complementary to the template strand. Some common examples of primers we would use in the case of assessing tissue growth are PCNA/Ki67 for proliferation, CASP3/BLC2 for apoptosis, STAR/FSHR for steroidogenesis etc. Serial dilutions of cDNA under proper protocol using desired primers can undergo PCR to determine the efficiency of that primer. In this case, I began by using β-actin which is a common housekeeping-gene, or gene consistently expressed across tissues, to get a understand of how to determine efficiency. Pictured above is the real-time graph of fluorescence over time using β-actin on the LightCycler96 machine, which you can see a common melting curve as well as a clean amplification which is indicative of proper efficiency. The data can then be analyzed in the LightCycler software to view specific Cq values and efficiency linear graph which will further help you assess how well the primer worked.

Week 5
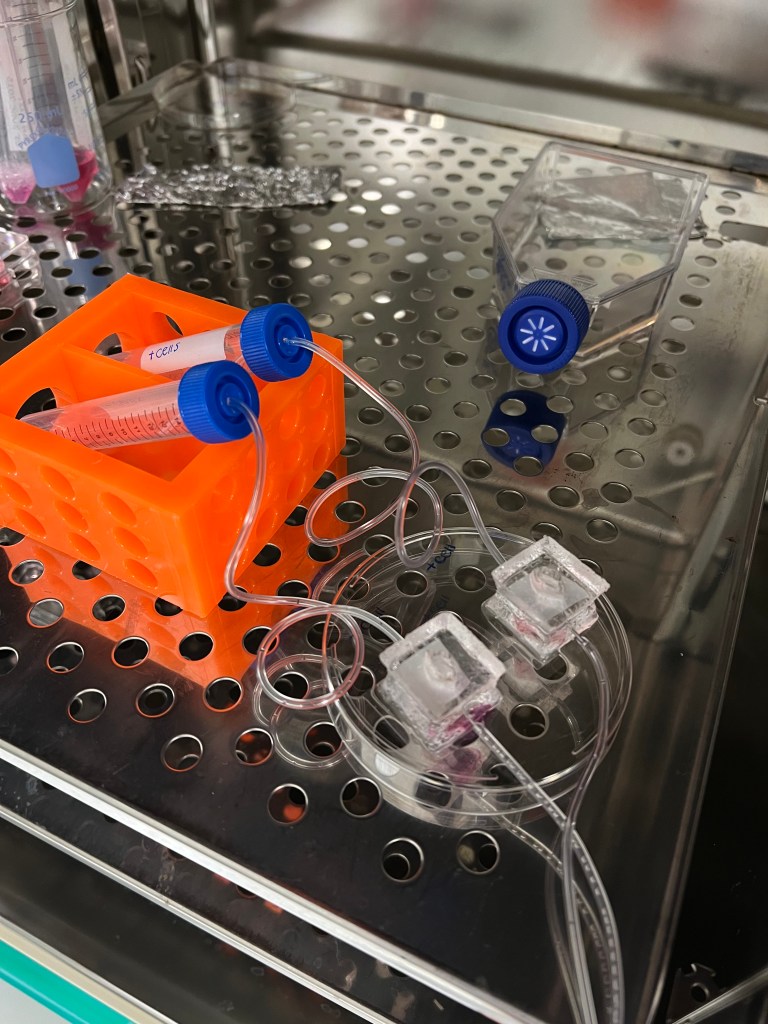
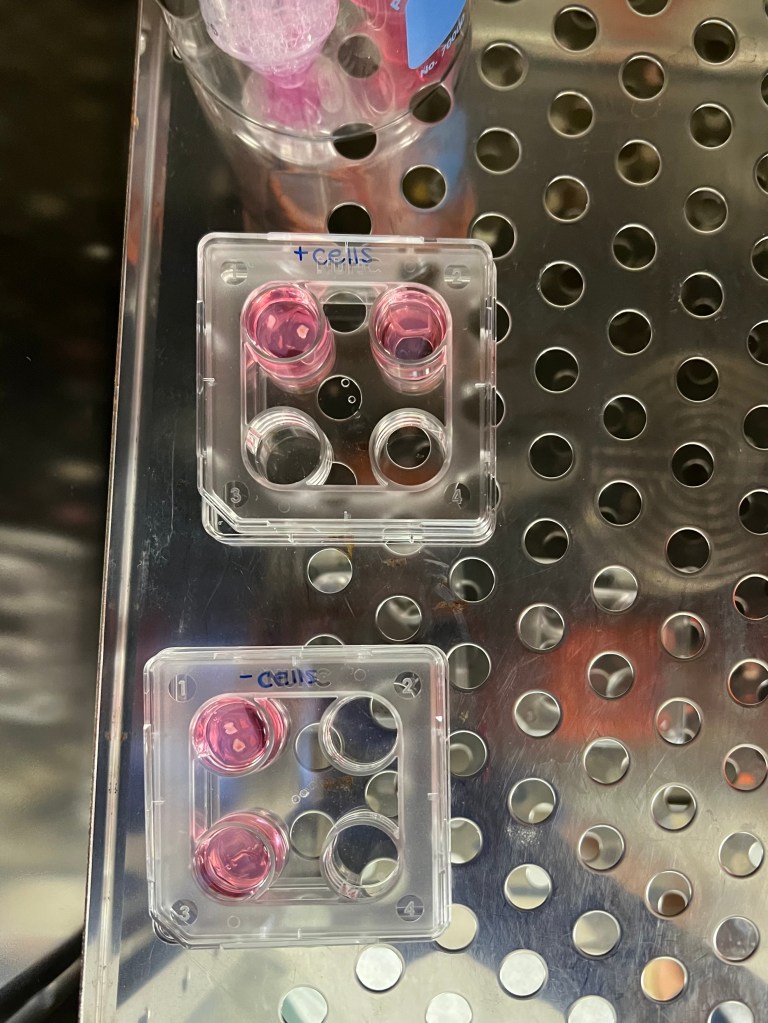
During the fifth week we had ended the previous culture involving the 3 cats and began a culture using a bigger model of the chips to see if it would have the same functionality. Being able to use the bigger chip would be advantageous in that it would allow for easier manipulation/observation of the tissue during culture and allows for more culture media, and in turn nutrients, to the tissue. When setting up the chip structure it is important to place the tissue in a way that the vascularized side is facing down towards along the membrane, rather than towards the air to ensure it is properly receiving nutrients. In the smaller chip it can be difficult to orient the tissue in such a way given that the surface/hole is so small. Use of the bigger chip would allow for easier manipulation of the tissue and more stability of the protruding needles.
Rather than using cats for this culture, I used tissue in both the (-) cell and (+) cell from one dog:
- 17 weeks old, Jindo
Just like the previous cultures, this culture was run for 6 days with the only difference being the pump rate of the syringes which was increased to 100 µl/hr to compensate for the larger surface area. Dog ovarian tissue also differs in the fact that it does not thrive in culture media containing FBS, so this culture was fed with EGM composed of all necessary ingredients except for FBS.
Optimizing RNA isolation techniques
The first step in RT-PCR is extracting/isolating the RNA of your desired tissue. Once this step is complete, the Nanodrop device is used to analyze your RNA concentration of each sample. An ideal RNA concentration hovers around 125 ng/µl however throughout several days of isolating RNA the concentrations seemed to always be inconsistent or lower than not, producing concentrations around 20 ng/µl. Although these concentrations are still usable, we dedicated some time to determining the most optimal way in isolating RNA to yield the highest concentration.
The typical protocol involved storing the cultured/fresh tissue in a storage reagent called ‘RNAlater’ for two hours, disposing of the RNAlater, and then transferring the tissue to the -80° C freezer for long-term storage. RNAlater helps stabilize RNA in a sample so it can be extracted and analyzed at a later date. In determining other techniques to yield a higher RNA concentration, this step was altered as well as the first step in extraction involving the lysate. Dog ovaries were picked up from the clinic that afternoon and ~5 mg of tissue was used for sampling. The various techniques tested were as follows:
- Flash freeze fresh tissue using liquid nitrogen w/out RNAlater → extract
- Lyse the tissue then flash freeze w/out RNAlater → extract
- RNAlater then flash freeze
- RNAlater then -80°C
- Homogenize with mortar & pestle
Compared to the conventional RNAlater then -80°C, the highest concentration of RNA resulted from the tissue that was flash frozen without RNAlater and then homogenized using the mortar and pestle!
Weeks 6 & 7
During this week I set up my own culture using the smaller chips consisting of two cats as well as familiarized myself with the protocol for immunohistochemistry (IHC). IHC is a technique used to visualize cellular components using specific antibody/antigen binding in a tissue sample. A primary antibody is used to bind to the antigen in the tissue allowing for quantification and localization of the antigen.
There are several methods of performing IHC, here I utilized the indirect method which involves the use of a secondary antibody along with the primary to amplify the signal. Results can also be visualized through a chromogen (color) or fluorogen (flourescence), in this case I used fluorescence. The protocol begins with ethanol rinsing of the tissue and the creation of a buffer solution with the proper pH. The tissue samples will then be boiled in the pH buffer in order to break formalin cross links created during fixation and unmask the antigens.
A blocking agent is then placed onto the tissue samples to prevent any non-specific binding. The tissues can now be incubated with the primary antibody. I used CD31 antibody, an endothelial cell marker, raised in the mouse. The primary antibody used should always be raised in an animal different from the tissue to prevent cross-reactivity between the antibody and other present proteins. After primary antibody incubation overnight, the tissue is then incubated with the secondary antibody for an hour which will bind to the primary and amplify the signal. The same trend persists with the secondary antibody must be raised in species different from the primary. DAPI is a blue nuclear stain, used to confirm the CD31 is marking the encapsulating endothelial cells.
Unfortunately, my results were inconclusive as every IHC takes time to optimize the protocol. Antibody efficiency can vary from tissue sample to sample as well as incubation time, dilution factor, etc.
Week 8
Because my IHC results were inconclusive, during the following week I was able to learn an immunocytochemistry (ICC) protocol in hopes of visualizing results. ICC differs from IHC in that it focuses on localization in individual cells rather than a section of tissue. ICC can sometimes yield results more easily as the cells do not undergo paraffin embedding, and subsequently do not need to include a buffer boiling step. Granulosa cells were seeded at a concentration of 100,000 cells/well and fixed with 2% paraformaldehyde overnight before permeabilization.
Permeabilization with a PBS/Triton X solution allows for the cell membranes to be permeabilized with the antibody. A blocking solution, donkey serum, was used to prevent non-specific binding and the cells could then be incubated with a primary CD31 antibody. After incubation and several PBS washes, the secondary antibody and DAPI were placed into the wells and the cells were able to be fluorescently visualized under the microscope! Unfortunately, there was a lot of background staining and no distinct indication of endothelial cells. This could be due to an incorrect primary/secondary dilution, not enough blocking serum, not a long enough incubation etc. Although my results were yet again inconclusive it was useful to become familiar with both the protocols for IHC and ICC for future application.

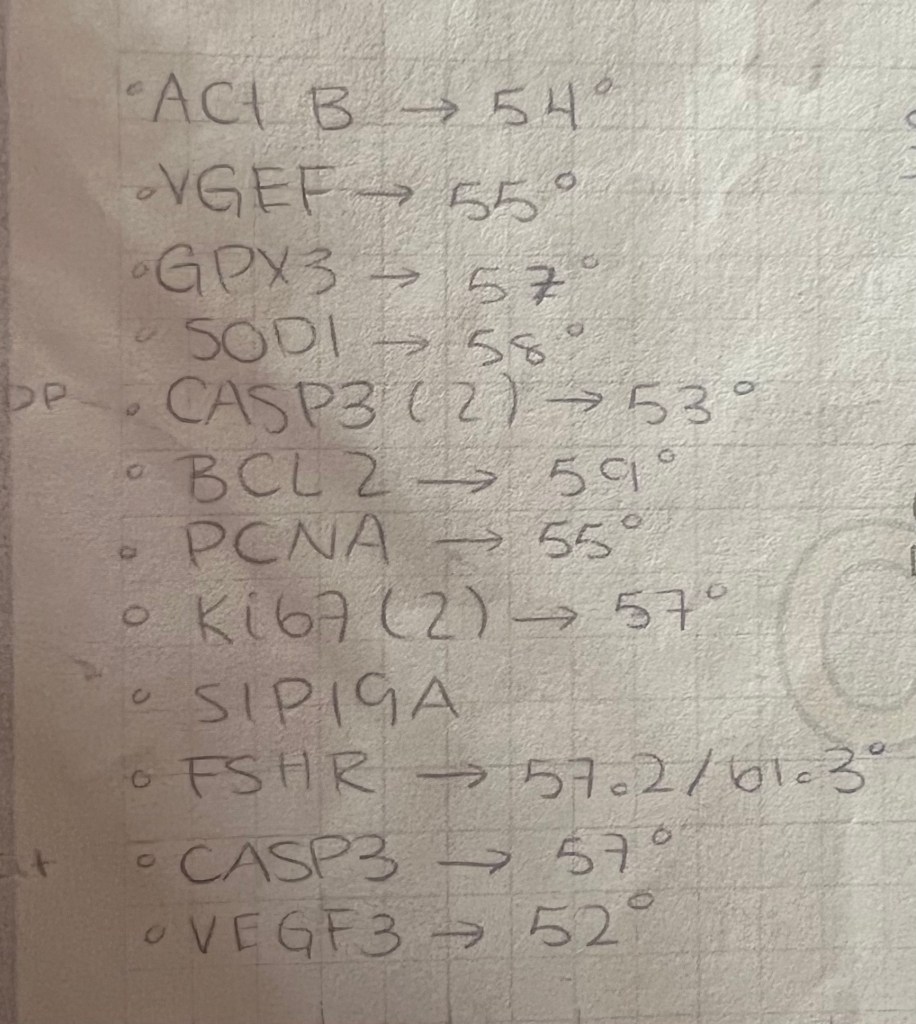
Throughout this week, I also began to run some primer efficiency tests to determine which primers I would be using in the RT-PCR analyses for my final data sets. Efficiency tests consist of running each primer of choice in a serial dilution of cDNA and examining the melting curves, r^2, and efficiency values etc. in the LightCycler 96 software. It took some time to acquire concrete results as optimal temperatures for each primer need to be assessed and there could be errors with pipetting, the PCR equipment, and so on. I ran efficiencies on all of the primers listed above:
Week 9
Week 9 consisted of continuing my RT-PCR primer efficiency analyses and beginning to wrap up all other workings I had going on! Considering the PCR would take about 2 hours to run, in between plates I would spend most of time cutting more tissue sections on the microtome to make a slides and then stain those slides. By the end of the week I was able to determine which primers I would be using for my final data analyses based on the best recording efficiencies and common optimal temperatures:
- B-Actin – a common housekeeping gene, used as a baseline to normalize the following other genes expression
- Glutathione Peroxidase 3 (GPX3) – involved in catalyzing the reduction of organic hydroperoxides & hydorgen perxoide, therefore protecting cells from oxidative stress. It was hypothesized in the case of the endothelial cell co-culture that their role in excretion of reactive oxidative species (ROS) and confluence in the culture system could potentially contribute to an increase in oxidative stress upon the endothelial cells and follicles.
- Proliferating Cell Nuclear Antigen (PCNA) – functions as a platform for proteins involved in DNA replication. Increased expression of PCNA would be indicative of tissue proliferation.
- Follicle Stimulating Hormone Receptor (FSHR) – the receptor for FSH, the hormone heavily involved in folliculogenesis. Increased expression of FSHR would indicate follicles were actively developing.
- Vascular Endothelial Growth Factor (VEGF) – VEGF was also interesting to analyze in terms of the co-culture and it act actively plays a role in angiogenesis/late antral stages of folliculogenesis
Journal Club
Every other week, journal clubs were also held among the interns, other students, and post-doc fellows to discuss papers we would find novel/interesting. The papers could vary on topic but had to relate to conservation, this week I chose one of the papers up for discussion which was “The Production of Mare Chorionic Girdle Organoids That Secrete Chorionic Girdle Gonadotropin”:
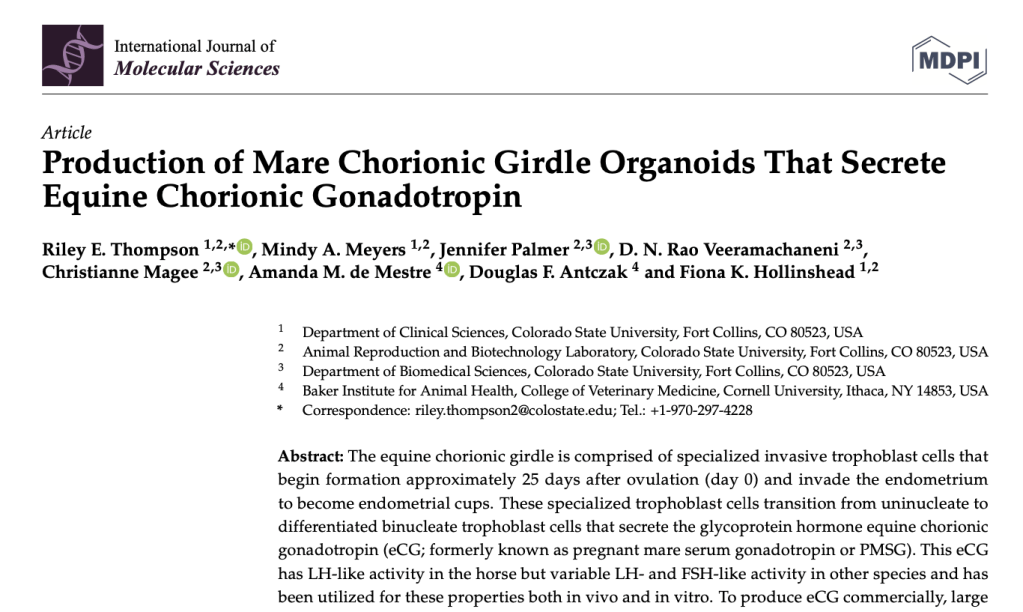
It was a pretty interesting paper that was actually conducted by a previous student of one of the other reproductive biologists at SCBI! This paper discussed the creation of mare chorionic girdle organoids in effort to produce equine chorionic gonadotropin (eCG) in vitro, a pregnancy hormone commonly used in other species reproduction to induce estrus. Organoids are 3D culture systems made to create small scale representations of organs and in this case the chorionic girdle of the mare, a small structure of the developing fetus. It was hypothesized that organoid production would be an easier, less invasive way of harvesting eCG but unfortunately the results did not prove it to be any more effective or easier than creating monolayer cell lines using trophoblast cells.
Week 10
My final full week!
During my final week, I was finally able to begin wrapping up my RT-PCR plates, examining histology sections, and got to become familiar with some other cool techniques not involved in my particular research.
ELISA
Up in the endocrine lab in the veterinary hospital, there are interns and researchers participating in hormone sampling of various species such as cheetahs, elephants, and cranes. Because my cultures were finished at this point, I was lucky enough to be able to observe a researcher perform some ELISA on an elephant serum sample. ELISA stands for enzyme-linked immunoabsorbent assay and is a technique used for detecting and quantifying proteins, antibodies, and hormones. In the case of this particular researcher, these assays are important in determining the relevant FSH, LH, Progesterone, and other important reproductive hormones expression in correspondance to the elephants known reproductive cycles. There are many different ways of performing ELISA, this particular plate utilized the competitive ELISA technique which involves detecting the presence of an antibody through signal interference of labeled/unlabeled antigens
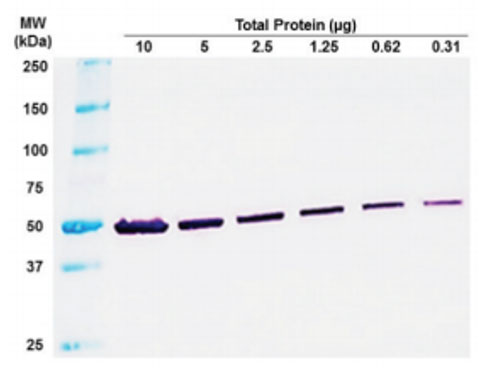
Western Blots
A master’s student in the gamete labs project consisted of performing some Western Blots so I was able to watch her do some during my free time! Western blot is another technique used for protein analysis in a blood or tissue sample. It uses gel electrophoresis to create bands of proteins which become apparent in the gel in certain areas depending on their molecular weight, which allows you to determine if a particular protein of a known mass is present in the sample.
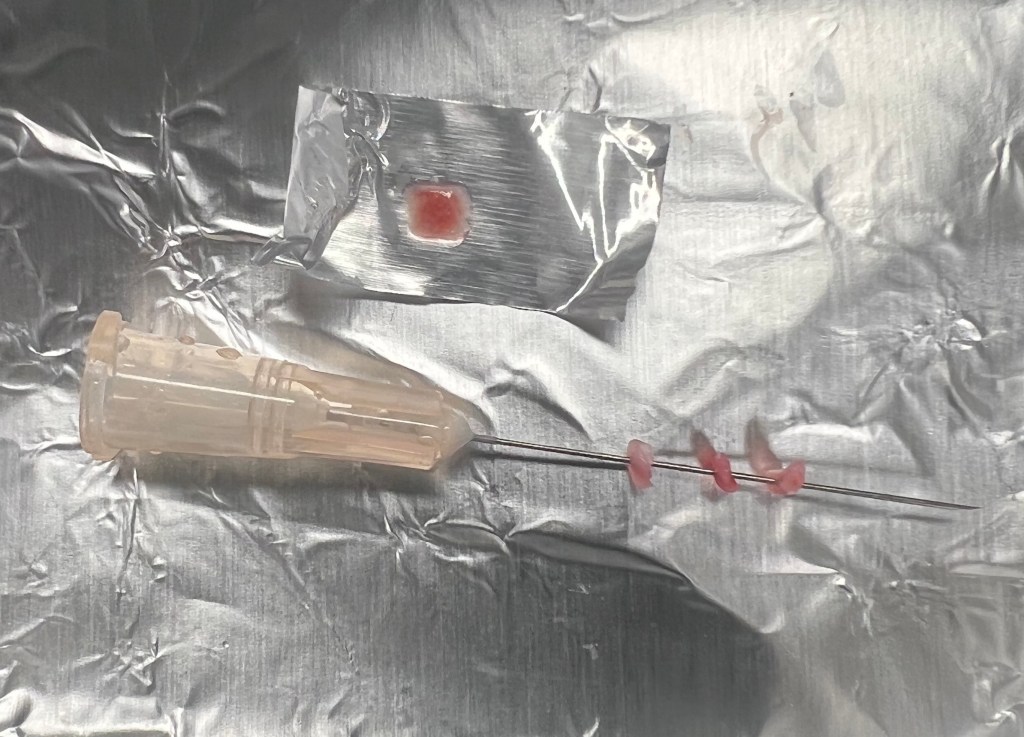
Cryopreservation
Cryopreservation was involved in my experiment in the case of the endothelial cells, but considering they were already frozen upon my arrival I was really only exposed to the thawing techniques. Therefore, during this week I was able to receive some lessons of the process of cryopreservation. Cryopreservation is the process of conserving biological samples like cells and tissues at a relatively fast pace and extremely cool temperatures to allow for long term storage. There are several different ways of doing it, with many of those ways involving the use of cryoprotectants which are used to prevent ice formation which can cause damage to the tissue/cells viability. Therefore, a process called vitrification exists which was created to occur at an extremely rapid pace to exclude any possibility of ice formation. A technique called ‘needle immersed vitrification’ involves the alignment of tissue sections on a small needle which is then placed into liquid nitrogen to induce freezing throughout the whole tissue and reduce the adverse effects of cryoprotectants. Solid surface vitrification is another technique (seen above the needle) which involves placing the tissue on top a material such as aluminum foil to induce rapid freezing since using the foil as a conductor.
Final Presentation
During my last full week, I practiced my formal presentation skills by presenting to the Species Survival Department a slideshow reviewing the hypothesis of our project and the results acquired from the cultures I conducted. After statistical analyses of my data, it was concluded that my results were not statistically significant ( 🥲 ) but that is probably just due to small sample size, usually a project like this involves 20-30 animals to achieve results with consistent variability. A link to my slideshow to view the statistical charts:
Overall, my time at SCBI was an extremely educating, inspiring, and fun experience! I am so grateful to have received at opportunity to gain an inside look to the amazing biological conservation research done at the facility. This internship opened my eyes to the wide array in which scientists can contribute to conservation, inspiring me to continue incorporating conservation into my future veterinary medicine practice.
